Interface Overview
GeoLibre opens to a single workspace that is the same on desktop and in the browser. This page is a tour of that workspace so the rest of the User Guide can refer to its parts by name.
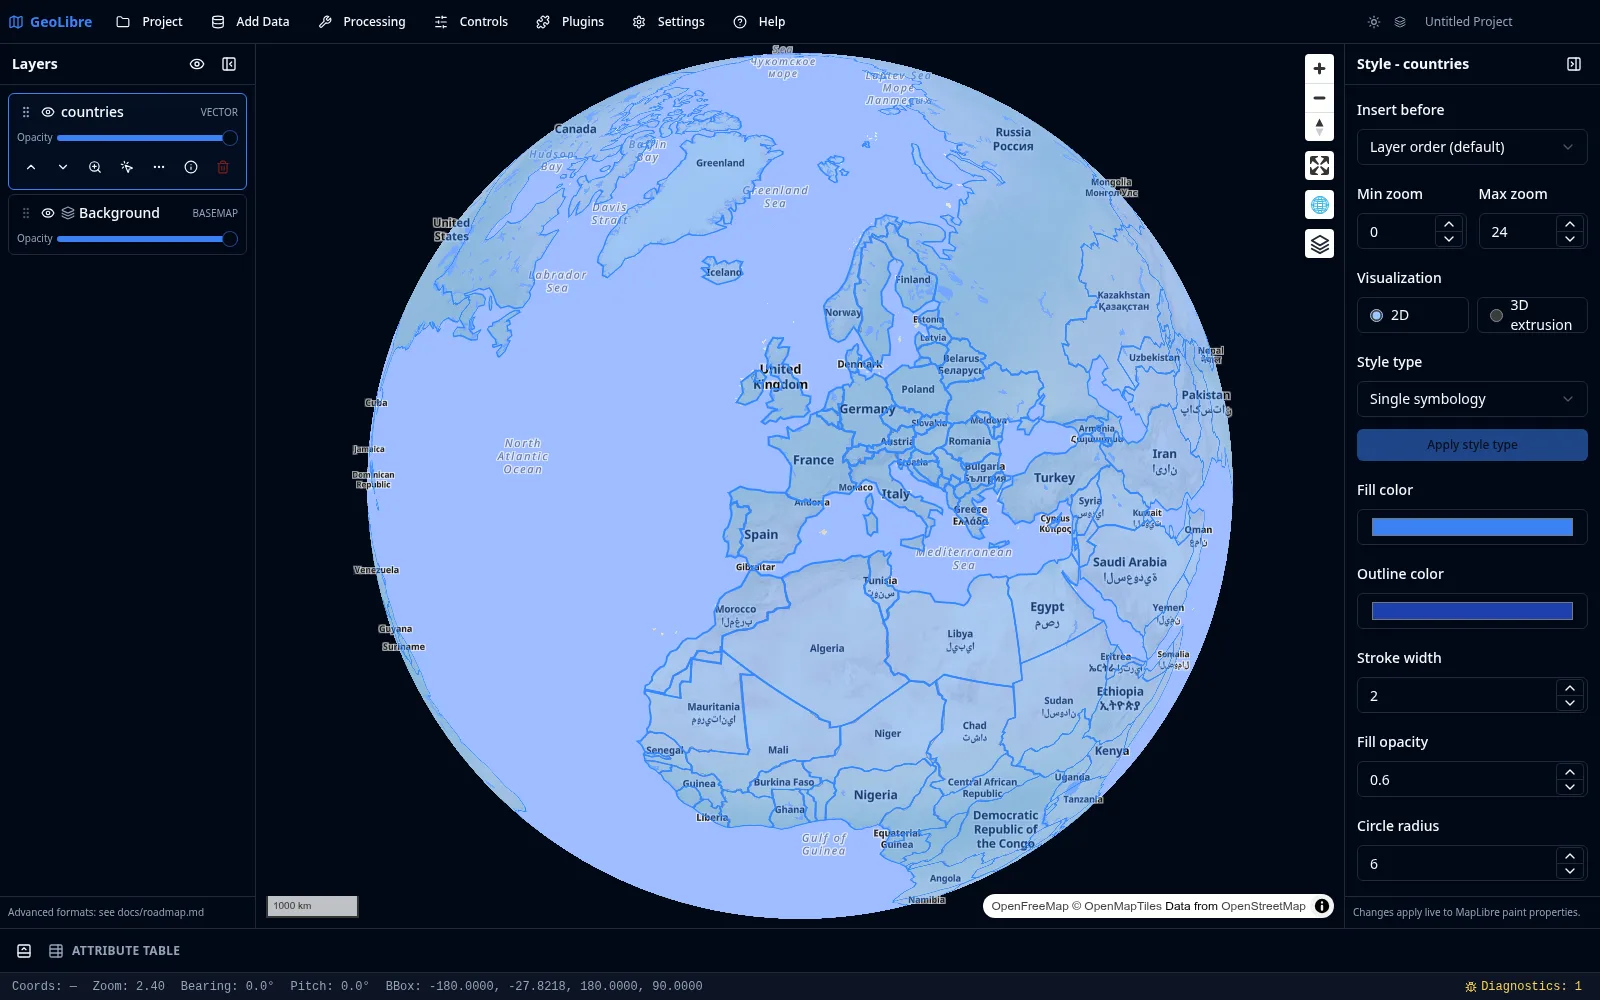
The top toolbar
The toolbar across the top of the window groups every action into seven menus:
| Menu | What it does |
|---|---|
| Project | Create, open, save, share, and print projects. See Projects. |
| Add Data | Add layers from files, web services, cloud formats, 3D data, and databases. See Adding Data. |
| Processing | Run vector, raster, conversion, Whitebox, and SQL tools, plus the AI Assistant. The menu holds two separate toolboxes, so some category names appear twice. See Processing Tools and SQL Workspace. |
| Controls | Toggle map controls and component panels (Measure, Bookmark, Minimap, and more). See Map Controls & Tools. |
| Plugins | Activate built-in plugins and set their on-map position. See Plugins & Marketplace. |
| Settings | Map preferences, layout, environment variables, project settings, and Manage Plugins. See Settings & Preferences. |
| Help | The command palette, keyboard shortcuts, diagnostics, feedback, update checks, and the About dialog. |
On the right side of the toolbar are the light/dark theme toggle and the editable project name.
Toolbar labels
On narrow windows the toolbar collapses to icon-only buttons. You can also force icon-only buttons from Settings → Layout, or with the toolbar=icons URL parameter. See Embedding & Sharing.
Command palette and keyboard shortcuts
Every menu and toolbar action is also reachable from the keyboard, so you don't have to hunt through nested menus.
- Command palette — press
Ctrl/Cmd+K(or Help → Command Palette, or Settings → Command Palette) to open a searchable list of actions: Add Data sources, Processing tools, Controls, Plugins, and more. Type to filter, move the highlight with the arrow keys, and pressEnterto run the highlighted command. - Keyboard shortcuts cheat sheet — press
?(or Help → Keyboard Shortcuts, or Settings → Keyboard Shortcuts) to see the full list of global shortcuts.
The built-in global shortcuts are:
| Shortcut | Action |
|---|---|
Ctrl/Cmd + K |
Open the command palette |
? |
Show the keyboard shortcuts |
Ctrl/Cmd + N |
New project |
Ctrl/Cmd + O |
Open project from file |
Ctrl/Cmd + S |
Save project |
Ctrl/Cmd + Shift + S |
Save project as… |
N |
Reset bearing (north up) |
U |
Reset pitch (top-down view) |
R |
Reset pitch and bearing |
[ |
Previous view |
] |
Next view |
The single-key view shortcuts mirror Google Earth Pro (N for north up, U for top-down, R to reset the view) and work anywhere in the app.
While the map has keyboard focus, MapLibre's own navigation keys are also available:
| Key | Action |
|---|---|
+ / - |
Zoom in / out |
| Arrow keys | Pan |
Shift + ← / → |
Rotate |
Shift + ↑ / ↓ |
Tilt |
Shortcuts are ignored while you are typing in a text field, so they never interfere with search boxes or attribute editing. On macOS the Cmd key is used; on Windows and Linux the Ctrl key is used.
The three panels
GeoLibre has three dockable panels around the map:
- Layers panel (left): the layer stack, including the basemap. Toggle visibility, change opacity, reorder layers, zoom to a layer, identify features, and open per-layer actions. See Managing Layers.
- Style panel (right): the styling controls for the selected layer, including data-driven styling for vector layers and image adjustments for rasters. See Styling Layers.
- Attribute table (bottom): the attributes of the selected vector or DuckDB layer. Expand it from the status bar. See Attribute Table.
Each panel can be shown or hidden from Settings → Layout, and panels auto-hide on small screens. You can resize the Layers and Style panels by dragging their inner edge.
The map
The map fills the center of the workspace. It uses MapLibre GL JS for vector and raster rendering, with deck.gl for point clouds, 3D tiles, and other advanced overlays. Pan by dragging, zoom with the scroll wheel or the on-map zoom buttons, rotate by holding the right mouse button and dragging, tilt by holding Ctrl/Cmd and dragging, and reset north with the compass button.
On-map controls such as zoom, globe, fullscreen, and the Layer Control appear in the corners. Which controls are shown is set from the Controls menu.
The status bar
The status bar along the bottom reports the live state of the map, from left to right:
| Readout | Description |
|---|---|
| Coords | The coordinate under the pointer. Click it to switch notation — see below. |
| Elev | The ground elevation under the pointer. Off by default; see Elevation readout. |
| GPS | The current fix, while GPS tracking is running. |
| Zoom | The map zoom level, to two decimals. |
| Eye alt | The camera's altitude above sea level — the same quantity Google Earth Pro calls Eye alt. |
| Bearing / Pitch | The camera rotation and tilt, in degrees. |
| BBox | The bounding box of the current view (hidden on narrow windows). |
It also holds a button to expand the Attribute Table and a Diagnostics button (also under Help) that surfaces any runtime errors.
Eye alt is scaled to the active celestial body, so it stays correct on a Mars or Moon basemap rather than reporting an Earth-derived height, and it follows the Scale bar units preference (metres/kilometres, feet/miles, or nautical miles). See Settings → Map Preferences.
Coordinate format
GeoLibre can report the pointer coordinate in four notations:
| Format | Example |
|---|---|
| Decimal degrees (default) | -83.92074, 35.96064 |
| Degrees, minutes, seconds | 35°57'38.3"N 83°55'14.66"W |
| Degrees, decimal minutes | 35°57.6384'N 83°55.2444'W |
| UTM (zone, easting/northing) | 17S 236594mE 3983527mN |
Decimal degrees are written longitude-first, matching GeoJSON and the rest of the app; DMS and DDM lead with latitude, the way those notations are conventionally written.
Click the coordinates in the status bar to cycle through them, or set the notation in Settings → Map Preferences → Coordinate format. The choice is saved with the project.
The UTM readout uses the same projection that draws the Gridlines UTM grid, so the numbers in the status bar always agree with the grid on screen. Outside the UTM latitude band (below 80°S or above 84°N) there is no valid UTM coordinate, and the readout falls back to decimal degrees.
Elevation readout
Controls → Elevation turns on the Elev readout. It is off by default, and it resolves the height under the pointer from one of two sources:
- From the map's own 3D terrain, whenever a usable sample is available there. This is instant, tracks the cursor live, and sends nothing off your device.
- From the public Open-Meteo elevation API when terrain returns no value for that point — because 3D terrain is off, but also when it is on and the terrain has no sample to give. The lookup waits until the pointer has been still for half a second, caches results per roughly 11 m cell, and runs only on Earth, never on a planetary basemap.
Because that fallback sends the coordinates under your pointer to a third-party service, GeoLibre asks for consent the first time you enable the readout. Declining is what guarantees the readout never reaches the network — turning 3D terrain on makes the remote lookup rare, but does not by itself rule it out. Decline and the readout still works wherever terrain can answer. While a lookup is in flight the readout is blank rather than showing the previous point's height.
Reading elevation along a line
For a profile rather than a single point, use the Elevation Profile plugin, or the Measure tool, which reports terrain-aware 3D distances.
Theme
Use the sun/moon button on the toolbar to switch between light and dark themes. The theme also follows your operating system preference by default, and you can set it for embeds with the theme=dark or theme=light URL parameter. See Embedding & Sharing.
Desktop and browser
The same UI runs as an installed desktop app (built with Tauri) and as a web app in the browser. The browser build covers most workflows, but features that need the local filesystem (file dialogs, local MBTiles and raster reads, project save/open, and the Python sidecar tools) require the desktop app. Each affected page notes these differences. See Getting Started for installation and Downloads for installers.